Solution was to add this line to /etc/iptables/rules.v4:
-A INPUT -p tcp -m state --state NEW -m tcp --dport 80 -j ACCEPT
And the equivalent for port 443 and IPv6 but I’m still in the middle of trying to get the thing working.
Edit: the relevant line for https is the same as above but with port 433:
-A INPUT -p tcp -m state --state NEW -m tcp --dport 443 -j ACCEPT
I think these lines need to be after the line enabling SSH on port 22 – or at least you need to make sure you don’t delete the line with port 22 or you’ll lose SSH access.
After making the changes you need to refresh with:
Swift 4.2 brings a really handy protocol for Swift enums that Dave Sims and I discussed back when he gave his talk on Swift enums to the iOS developer meetup in Limerick (and subsequently in Dublin and Indianapolis). The problem is this: when you have an enum in Swift you often want an array with all its cases. Because you’re displaying those cases in a table view or a segmented control or any other UI element that has a concept of an index. I’ve settled on the code like the following to manually add the relevant array:
public protocol AllCaseable {
    static var allCases:  [Self] { get }
}

enum PaymentType: AllCaseable {
    case cash
    case creditCard
    case voucher
    static var allCases: [PaymentType] {
        return [.cash, .creditCard, .voucher]
    }
}
This works OK but it’s ultimately manual and error prone. Add a new customerAccount case? Well if you forget to add it to your allCases() function the compiler won’t complain at you. And it’s another protocol conformance that you have to write manually that you feel really should be built in.
Swift 4.2 changes that with the CaseIterable protocol. Now you can just write:
enum PaymentType: CaseIterable {
    case cash
    case creditCard
    case voucher
}
And you get the allCases property for free. Add a new enum case and you don’t have to write any other extra code to get your table views and your segmented controls to update. Surprisingly Swift 4.2 didn’t ship with Xcode 9.4 yesterday (which makes me think we mightn’t get Swift 5 with Xcode 10, which would be the right choice I think, ABI stability is too important to try and shoehorn into Apple’s annual release cycle) so you can only try it out with development builds of Swift, but it’s going to be pretty great when it ships. Note that it doesn’t work out of the box with enums that have associated values however.
Side note: I’m happy I the allCases property I’ve been using was chosen for the CaseIterable protocol, but I have to admit “CaseIterable” is way better than my “AllCaseable”. I’m a bit rubbish at picking names for Swift protocols.
I was talking to two Objective-C iOS developers recently who told me that they were starting to learn Swift. This got me thinking: what did I wish I knew when I was learning Swift? Here are eight tips that are opinionated: they are not designed to help you learn Swift, but they might help you to work with the language instead of against it.
1. Avoid force unwrapping and force casting
I’ve written about this before – and it annoys me that Xcode sometimes recommends force unwrapping Optionals as a fix-it. Force unwrapping with ! and force casting with as! will bite you in the end – don’t do it. (Possible exception – objects from Storyboards and interface builder files, as their types are defined at runtime).
2. Prefer guard let over if let
You’ll learn that the classical way to unwrap an Optional is to use if let. The problem with if let is that it can cause pyramids of doom of closing braces in your functions. Consider this example:
if let processedString = funcThatReturnsAnOptionalString("parameter") {
    if let secondProcessedString = funcThatReturnsAnOptionalString("another parameter") {
        if !processedString.isEmpty && !secondProcessedString.isEmpty {
            //do stuff
        }
    }
} // yuk
Solution: use guard let introduced in Swift 2:
guard let processedString = funcThatReturnsAnOptionalString("parameter") else {
    //you may want to perform error handling here
    return
}
guard let secondProcessedString = funcThatReturnsAnOptionalString("another parameter") {
    //handle error if necessary
    return
}
if !processedString.isEmpty && !secondProcessedString.isEmpty {
    //do stuff
} //goodbye pyramid of doom
This gives you a fail early pattern and allows you to avoid unnecessary indentation.
3. Unwrap multiple things at once
You’ll run in to another problem once you start using guard let: you’ll find your functions compress horizontally (less indentation) but will expand vertically (more lines of code). Solution: unwrap multiple things at once. Consider the example above compared with:
guard let processedString = funcThatReturnsAnOptionalString("parameter"), let secondProcessedString = funcThatReturnsAnOptionalString("another parameter") else {
    //handle error if necessary
    return
}
if !processedString.isEmpty && !secondProcessedString.isEmpty {
    //do stuff
}
Caveat: I find that if I’m unwrapping more than three things at once, it’s a code smell and I need to refactor. Also: it’s possible to combine guard let with traditional guard statements with conditional clauses: although I’m on the fence whether this is a good idea or impedes readability, I do find that it works as long as I restrict it to conditionals that answer the question “is this thing valid enough for me to work on?”. This would be achieved with the following (make your own mind up if this is taking things too far):
guard let processedString = funcThatReturnsAnOptionalString("parameter"), let secondProcessedString = funcThatReturnsAnOptionalString("another parameter"), !processedString.isEmpty, !secondProcessedString.isEmpty else {
    //handle error if necessary
    return
}
//do stuff
4. Understand that optionals may cause your app to fail differently
To be fair this is less of a problem for Objective-C developers, who are used to the paradigm “sending a message to nil is grand, at least if you’re expecting an object in return, because you’ll just get nil back”. But for developers coming from object-oriented languages such as C++, Java, C#, etc. it might be a bit of a surprise that you get far fewer crashes in Swift apps if you don’t force unwrap, because the language can eliminate a whole class of “null pointer exception” crashes if you use it correctly. This is not the same as eliminating bugs due to unexpected input! Instead of bug reports “the app crashes when I tried to do this”, you’ll start to get reports of “nothing happened when I tried to do this”. Prepare accordingly.
5. Use structs (when you can)
Although Swift supports object-oriented programming with classes, it brings a new more powerful paradigm: protocol oriented programming. This works best with the value types struct and enum and also gets you extra benefits: default initialisers, thread safety, and a way out of the sometimes baroque structures that class inheritance can encourage. But there’s a caveat: note that the two popular object persistence methods used in Swift (Core Data and Realm) use classes. And at the UI layer, UIKit on iOS and AppKit on macOS are all class-based. So your potential for using structs may actually be quite limiting (which can be a bit confusing because most introductions to Swift focus on structs, not classes, which leaves you with a mismatch between learning the language and using it). That said, do try and use structs where you can, especially in the intermediate layers between your view controllers and your model objects.
6. Enum all the things
That’s the title of a talk given by Dave Sims at the Limerick iOS Developer meetup that was so good he famously ended up giving the talk at other meetups in Ireland and the US. Enums are first-class (pardon the pun) value types in Swift that can have functions, properties, and most of the things that structs can have, as well as associated types. They are a tremendously powerful tool when writing swift apps.
7. Avoid AnyObject, and start to think about protocols and generics
Say you have two UITableViews in your app, which are mostly similar – you might be tempted to write one UITableViewController to avoid code duplication. What do you use as your datasource? One way might be to use an array of AnyObjects (AnyObject is a special type which means an instance of any class). Any time you’re relying on run-time type checking is a good prompt to think about protocol orientated programming. At its simplest, create a protocol and make your two types conform to it (they can even be blank). Add any common properties to allow the Swift compiler to check the validity of your code. Generics offer another powerful way of avoiding code duplication and increasing compile time safety. You can even create generic protocols using Protocols with Associated Types.
8. Add defaults to function parameters
Finally a quick one – if a function you’ve written almost solves your current problem, but needs an extra parameter, add it to the existing function with a default value instead of creating a new function. The default value will mean that existing calls to that function won’t break. I’ve often found that making the parameter an Optional type and setting its default value to nil allows an if let in the function body to neatly deal with the extra parameter.
Conclusion
Swift is still a young language, and best practices are by no means settled. To take an example from Erica Sadun’s excellent book Swift Style: An Opinionated Guide to an Opinionated Language, the Swift Standard library team prefer a space either side of a colon in declarations:
class userDetailViewController : UIViewController {
where the Apple developer docs team prefer left-hugging colons almost everywhere:
class userDetailViewController: UIViewController {
(for what it’s worth I prefer the second approach). I don’t even follow all the recommendations listed in this article all of the time in my own code. What’s important is that as you learn the language, you’re aware of working with the language and its opinions, rather than against it.
At our last iOS Developer meetup in Limerick, my Worst Case Scenario podcast co-host Dave Sims gave an excellent talk on Optionals in Swift. I’m hoping that Dave will put the content online some day as he really managed to provide a simple yet powerful overview of what Optionals are. He also ended up being invited to give his talk to the CocoaHeads meetup in Indianapolis via Skype – check out Worst Case Scenario Episode 36 for the details about how that came about.
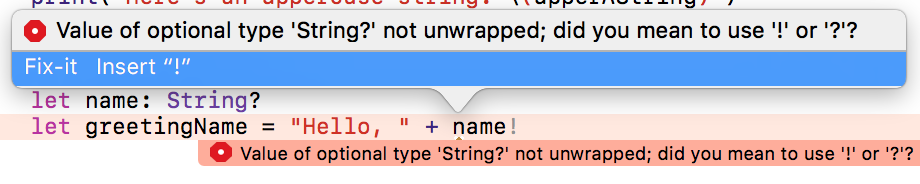
Dave mentioned in his talk that force unwrapping Optionals is generally a bad idea. Xcode doesn’t help the matter though by actually encouraging programmers to force-unwrap optionals:
This is terrible advice for programmers new (or not-so-new…) to Swift. Force unwrapping a nil optional will cause a runtime crash. The whole point of optionals is you make a whole class of bug, where a nil creeps in and causes havoc down the line, impossible. Force-unwrapping throws all of this away with the dubious upside of saving a line or two (and shutting up the compiler). You can argue that the Apple documentation is pretty clear about force unwrapping being a bad idea, but I feel the tools should be encouraging best behaviour. Dave mentioned three common unwrapping techniques:
if let
guard let
The ?? nil coalescing operator to provide a default value
Dave also mentioned Chris Lattner’s recent appearance on Accidental Tech Podcast where Swift’s creator talked about the purpose of the guard statement was to allow early exit (Overcast link that jumps directly to that segment), a style which he is personally in favour of. I also like this style – it reduces the indentation for the main bit of the code. You just have to remember to actually exit the block, either by asserting or returning a default value.
My fellow podcast hosts on Worst Case Scenario had both got smart home gear for Christmas. I was feeling a bit left out so I wanted to hack together a low-budget version. Here it is in action:
Now I can use Siri (or the iOS Home app) to turn on my Christmas lights from anywhere!
Ingredients:
Raspberry Pi
Relay shield from the gear we bought for the hackathon last year (it’s marked FE_SR1y)
Christmas lights
The relay shield has a transistor and a diode built in, so I didn’t need to do any fandaglement with a circuit, just hooked up the + to 5v on the Pi, – to Ground, and the switching pin to one of the GPIO pins.
On the Pi, I installed the excellent Homebridge which allowed me to create a HomeKit accessory that Siri can talk to. I used the homebridge-gpio-wpi plugin to talk to the GPIO pins.
It’s obviously super fast on my home wifi network but it’s also surprisingly speedy going through the phone network: iPhone -> phone network -> Apple’s servers -> Apple TV -> Raspberry Pi -> lights takes about 1.3 seconds.
I am toying with the idea of creating a low-budget connected home using 433MHz RF remote controlled sockets which I could control from the Pi with a transmitter board. The other two lads on Worst Case Scenario are also expanding their systems based on the Amazon Echo – subscribe and keep up to date with how we’re getting on!
But then I looked at how long it took: 0.44 seconds. Ouch! It’s not acceptable to block the main thread for that long. There’s a similar method for NSSet:
At this point I decided to benchmark the results by running the test on 500 randomly selected words, where 5% of the letters were turned into blanks. Here’s a sample from my test word list of 500 words:
Running the test with 500 different words and measuring the time it took to do each test enabled me to record the mean, minimum, maximum and standard deviation of each method. Unfortunately I had to run these tests on the iOS simulator – turns out there’s a subtle bug when repeatedly running an NSPredicate which causes a huge number of NSComparisonPredicate objects to be malloc’ed and not freed, causing the tests above to blow up due to memory pressure on my 5S.
Using the simulator, here’s the results of the test with filteredArrayUsingPredicate: and filteredSetUsingPredicate:
Method
Average
Min
Max
Standard Deviation
filteredArrayUsingPredicate:
0.15
0.12
0.34
0.03
filteredSetUsingPredicate:
0.16
0.14
0.54
0.03
Other in-memory methods
I then tried a litany of various methods on NSSet and NSArray to see if I could come up with something faster.
Using blocks: indexOfObjectPassingTest
    NSPredicate *predicate = [NSPredicate predicateWithFormat:@"SELF LIKE %@",wordToCheck];
    NSUInteger index = [wordArray indexOfObjectPassingTest:^BOOL(id obj, NSUInteger idx, BOOL *stop) {
        return [predicate evaluateWithObject:obj];
    }];
    if(index != NSNotFound)
    {
//can return the found word using index
}
Prefiltering NSArray
This method pre-filters the word list by narrowing it down to only words which have the same first letter (unless we have a blank as the first letter) as the word we’re trying to match.
    NSPredicate *predicate = [NSPredicate predicateWithFormat:@"SELF LIKE %@",wordToCheck];

    NSString *firstLetter = [wordToCheck substringToIndex:1];
    NSArray *smallerArray;
    //prefiltering on first letter will only work if first letter is not blank
    if([firstLetter isEqualToString:@"?"])
    {
        smallerArray = wordArray;
    }
    else
    {
        NSPredicate *firstLetterPredicate = [NSPredicate predicateWithFormat:@"SELF BEGINSWITH %@",firstLetter];
        smallerArray = [wordArray filteredArrayUsingPredicate:firstLetterPredicate];
    }

    NSArray *filteredArray = [smallerArray filteredArrayUsingPredicate:predicate];
    if([filteredArray count] > 0)
    {
//return matched word here if needed
}
Prefiltering NSSet
    NSPredicate *predicate = [NSPredicate predicateWithFormat:@"SELF LIKE %@",wordToCheck];

    NSString *firstLetter = [wordToCheck substringToIndex:1];
    //prefiltering on first letter will only work if first letter is not blank
    NSSet *smallerSet;
    if([firstLetter isEqualToString:@"?"])
    {
        smallerSet = wordSet;
    }
    else
    {
        NSPredicate *firstLetterPredicate = [NSPredicate predicateWithFormat:@"SELF BEGINSWITH %@",firstLetter];
        smallerSet = [wordSet filteredSetUsingPredicate:firstLetterPredicate];
    }

    NSSet *filteredSet = [smallerSet filteredSetUsingPredicate:predicate];
    if([filteredSet count] > 0)
    {
//return matched word
}
Using a compound predicate on NSArray
What if we combined the above two methods into a compound predicate – where we check to see if the first letter is the same AND the word is like the word we’re searching for. This might result in a faster match as we can avoid using the expensive LIKE predicate if the first letters are not matching:
    NSPredicate *predicate;
    //if first letter is blank we have to fall back to using normal predicate
    if([firstLetter isEqualToString:@"?"])
    {
        predicate = [NSPredicate predicateWithFormat:@"SELF LIKE %@",wordToCheck];
    }
    else
    {
        predicate = [NSPredicate predicateWithFormat:@"SELF BEGINSWITH %@ AND SELF LIKE %@",firstLetter,wordToCheck];
    }


    NSArray *filteredArray = [wordArray filteredArrayUsingPredicate:predicate];
    if([filteredArray count] > 0)
    {
//retrieve matched word here
}
Using a compound predicate on NSSet
    NSString *firstLetter = [wordToCheck substringToIndex:1];
    NSPredicate *predicate;
    //if first letter is blank we have to fall back to using normal predicate
    if([firstLetter isEqualToString:@"?"])
    {
        predicate = [NSPredicate predicateWithFormat:@"SELF LIKE %@",wordToCheck];
    }
    else
    {
        predicate = [NSPredicate predicateWithFormat:@"SELF BEGINSWITH %@ AND SELF LIKE %@",firstLetter,wordToCheck];
    }

    NSSet *filteredSet = [wordSet filteredSetUsingPredicate:predicate];
    if([filteredSet count] > 0)
    {
//match word here
}
We have managed to do a bit better with some of these methods, but we’re still nowhere near acceptable performance. Maybe Core Data might have some under-the-hood optimisations that might help us:
Core Data
I set up a simple Core Data stack, with one entity “Word” which had one attribute “word” (naming things is hard…). Here’s the method to retrieve a matching word in my data controller:
-(Word *)wordMatchingString:(NSString *)stringToMatch
{
    Word *wordToReturn;
    NSFetchRequest *request = [[NSFetchRequest alloc]init];
    //we want to retrieve all things
    NSEntityDescription *e = [[[persistenceController mom]entitiesByName]objectForKey:@"Word"];
    //set the entity description to the fetch request
    [request setEntity:e];
    NSPredicate *predicate = [NSPredicate predicateWithFormat:@"word LIKE %@",stringToMatch];
    [request setPredicate:predicate];
    //limit to one result
    [request setFetchLimit:1];

    NSError *error;
    //execute the fetch request and store it in an array
    NSArray *result = [[persistenceController mainContext] executeFetchRequest:request error:&error];
    //if not successful, throw an exception with the error
    if(!result)
    {
        [NSException raise:@"Fetch failed" format:@"Reason: %@",[error localizedDescription]];
    }

    //return the only object in the array
    wordToReturn = [result lastObject];
    return wordToReturn;
}
And here’s the method to match the word:
    Word *foundWord = [[WSDataController sharedController]wordMatchingString:wordToCheck];
    if(foundWord)
    {
}
The results for this were all over the place:
Method
Average
Min
Max
Standard Deviation
Core Data
0.10
0.001
0.76
0.06
I had high hopes for Core Data but it’s just not fast or consistent enough for this application.
Descent into SQLite
I was about to give up at this point. I asked Dave Sims if he had any advice and he suggested implementing a Directed Acyclic Word Graph (DAWG) which would be very efficient for finding matches – despite the opportunity to make “yo dawg” jokes I reckoned it might be a bit above my pay grade for some weekend pottering.
I’d read about some iOS developers preferring to deal directly with SQLite for their persistent storage, rather than using Core Data (which uses SQLite as one of its storage options). Relishing the opportunity to type in all caps, I followed a tutorial to get a basic SQLite setup going (the tutorial has a small error in, which XCode will catch with a warning, the solution is to replace the offending line with if (sqlite3_step(compiledStatement) == SQLITE_DONE) { ). Here’s my SQLite query:
    //SQLite uses underscores as the single character wildcard
    NSString *underscoreString = [wordToCheck stringByReplacingOccurrencesOfString:@"?" withString:@"_"];
    NSString *query = [NSString stringWithFormat:@"SELECT word FROM words WHERE word LIKE '%@'",underscoreString];
    NSArray *resultsArray = [[NSArray alloc] initWithArray:[self.dbManager loadDataFromDB:query]];
    if([resultsArray count]>0)
    {
}
This gave the following results:
Method
Average
Min
Max
Standard Deviation
SQLite
0.017
0.0014
0.056
0.004
Success!
Using SQLite not only resulted in faster matching, it was also much more reliable than any of the other methods, with a very small standard deviation. Obviously matching a string in an array of 170,000 strings is an edge case, and for most cases any of the other methods would have sufficed.
It’s also worth noting that I was able to run the Core Data and SQLite tests on my own iPhone 5S as they do not suffer the same NSPredicate memory leak as the other methods. Here are the results on the phone:
I do much of the post-production editing for the two podcasts that I’m on: Worst Case Scenario with Baz Taylor and David Sims, and Atlantic 302 with Pat Carroll. Some people have been kind enough to compliment the production quality of the podcasts but I’m still frustrated when I hear how good some of my favourite podcasts sound. I’m still learning about this stuff, and I know I have a long way to go, but I thought I would document my current method. Critiques welcome!
I’m indebted to Jason Snell of SixColors who wrote a very detailed guide on how he edits his podcasts. Much of this guide is based on Jason’s recommendations. Like Jason, I use Logic Pro X for editing, specifically for its Strip Silence function which isn’t available in GarageBand. I add an extra pre-production step of noise reduction in Audacity, as an unacceptable level of hiss was creeping into the recordings without this.
Recording
We sometimes record in person, but most of our episodes are recorded remotely. We sit in our own houses and chat over Skype. We don’t actually record the Skype call, instead we each record our own audio locally and then I mix it together later. We have a pre-recording ritual which consists of three steps:
I count us in to hit Record in GarageBand. This means that the audio tracks will start at roughly the same point.
I ask for five seconds of silence at the start of recording. This provides a convenient place at the start of each track to get a sample of background noise for noise reduction.
I turn up the volume on my headphones, hold the headphones to my mic, and ask each host to talk into their microphone separately. This marks a point where the same audio is appearing both on my audio track (through the headphones) and on the host’s track, identical audio which allows me to sync up the tracks. Of course it’s not truly simultaneous as Skype introduces latency, but it’s good enough.
Sharing
The other hosts on the podcast then send their GarageBand files to me. Baz and Dave are users of the native macOS Mail app, which has a feature to send large files called MailDrop. For Atlantic 302, Pat and I have a shared Dropbox folder that he copies his file over. I mention this because the files involved are large: Atlantic 302 is a 30-minute show and our separate audio files are about 270Mb. Editing podcasts takes up a lot of disk space! (As a side note, I save my working podcast files in a subfolder of Downloads, and exclude the Downloads folder from Time Machine, to prevent backups getting too big).
Export
GarageBand has a default voice recording setting, which adds lots of effects such as reverb. The GarageBand interface is a little confusing, so I created a blank ‘patch’ with no effects whatsoever. I apply this patch in the Library before exporting. I’ve uploaded this blank patch in case you want to use it: it needs to be copied to ~/Music/Audio Music Apps/Patches
– you’ll need to create this folder if it doesn’t exist already.
I export each GarageBand file using the Share > Export Song to Disk menu command, and I save as an uncompressed 16-bit AIFF file. Rather annoyingly, this step creates a stereo AIFF file even though the recorded track from the microphone is mono, I haven’t bothered to figure out how to change this, so I just continue the rest of my workflow in stereo, and then convert to a mono MP3 file at the end.
Noise reduction
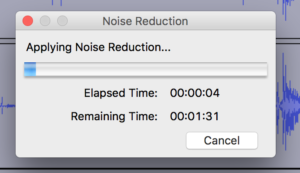
Our recordings tend to contain some hiss. If this hiss isn’t removed, it can be amplified at a later stage when applying compression. I use Audacity’s noise reduction function to pretty aggressively reduce noise in the AIFF files before dragging them in to Logic. I open a blank audio file, hit Cmd-Shift-I and select the AIFF for editing. I find the section of the audio at the start where everyone is silent, and select most of it, checking that there isn’t any breathing or noise that isn’t present through the whole recording. Then I select Effect > Noise Reduction and click Get Noise Profile to sample the background noise. I deselect the audio previously selected (important to do this, or the next step will only reduce the noise on the selection) and select Effect > Noise reduction again. You’ll notice there are lots of parameters to adjust, here are the settings that I use, chosen out of trial and error:
Noise reduction (dB): 24; Sensitivity 11.50; Frequency smoothing (bands): 10. The last option, Noise: , should be set to Reduce, not Residue.
This takes a long time, typically nearly two minutes on my 2015 MacBook Pro. I use this time to start exporting the other tracks from GarageBand, and dragging completed files into Logic Pro X. Once the noise reduction has finished, I choose File > Export Audio, and export as another 16-bit AIFF file.
Logic Pro X
Logic Pro X costs €200 in the Irish Mac App Store. I know this is a huge amount – which is why I edited the first few episodes of Worst Case Scenario in Audacity. But Logic has one feature called Strip Silence which saves a huge amount of time and I’m much quicker at editing once I switched.
To start, create a project in Logic. It doesn’t matter what input settings you use, as you will be importing the previously-recorded tracks. Drag your tracks in, you can even drag them in one go, if you do just make sure that you ‘create separate tracks’ in the dialog. Once you have done this, you can delete the original empty track that Logic added for you.
Syncing audio tracks
By now you should have your three audio tracks in Logic. To sync them up, I look for the audio at the start of the file where each host speaks into my mic via my headphones (described earlier). I drag each track to the left and right around this point until the audio is roughly in sync. I find it helpful to zoom in (by pinching the trackpad) to do this, you can sometimes align visually using the waveforms on the track.
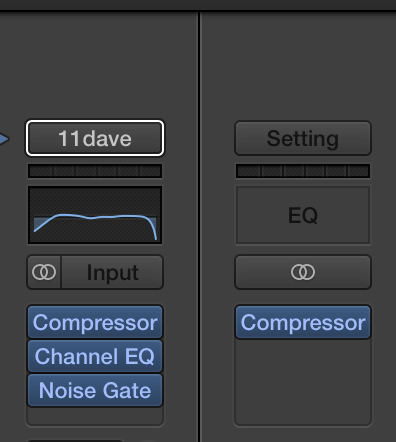
Audio effects and EQ
The Inspector sidebar in Logic, showing the Compressor, EQ and Noise Gate applied to Dave’s audio (left) with the master Compressor on the right
I apply previously saved patches for my co-hosts. You can download these patches: Thomas, Dave, Baz, Pat (you add these to the same folder as the blank patch explained above – Logic and GarageBand use the same plugins in the same folders). These patches contain an EQ (to emphasise and de-emphasise different sound frequencies), a compressor (to make quiet noises louder) and a noise gate (to ignore sound below a certain level). They are different based on certain factors, Baz, Pat and I use the same Pyle dynamic microphone but Baz and I both have fairly quiet voices, so they need boosting. Dave uses a Rode condenser microphone, which provides a lovely loud sound (the Pyle mics are very quiet) but tends to pick up more background noise. For my own patch, I added an extra DeEsser plug-in, as my ‘s’ sound is very hissy. Finally I add a master compressor on the output (it’s listed under Dynamics > Compressor) which effects all tracks, I turn up the compression to 3 and leave everything else at the default.
I try to avoid any clipping on the output meter (any positive number is clipping and will be shown in red), and will tweak the individual track compressor if someone’s audio is clipping, normally using the Make Up knob.
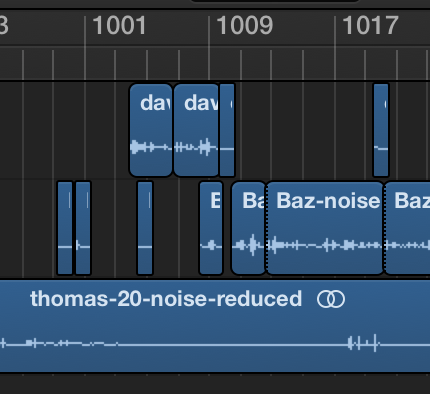
Strip Silence
Strip silence has been applied on Dave and Baz’s tracks, but not on mine
Now we get to where Logic earns its €200: the Strip Silence feature. This essentially translates a single continuous audio track into ‘blocks’ where someone is actually talking. This makes editing so much easier. The keyboard shortcut for Strip Silence is Ctrl-X (make sure you have the track highlighted), the settings I use are a tweaked version of Marco Arment’s recommendations – 2%/0.6/0.2/0.3 for those of us using dynamic microphones. I change the threshold to 4% for Dave’s microphone: as a condenser it picks up more background noise. As Marco points out, annoyingly Logic doesn’t remember your choices so you have to manually enter these in for every editing session.
Select following
At this point I delete all the chatter before the show starts, and I start editing proper. The one disadvantage of using Strip Silence is that you are left with a lot of empty sections where there are sections of the podcast where nobody is talking. This can be noticeable to the listener (depending on the background noise), so a lot of my editing work involves moving audio ‘back’ so there is no overlap. When you are faced with a period of silence, you want to select the next ‘block’ after the period of silence, and then use the Shift-F to select all blocks of audio following this block. You can then drag the audio back so that it cuts in just after the last person has finished talking.
Editing
As well as removing silences, you’ll often want to cut bits out. In the early days of Worst Case scenario, I was obsessive in cutting every last ‘um’ and ‘ah’, especially with my own voice. I’ve calmed down a bit now I’ve got used to listening my own voice (this took quite a while) and realising that these artefacts appear in everyday speech and the brain is incredibly good at filtering them out.
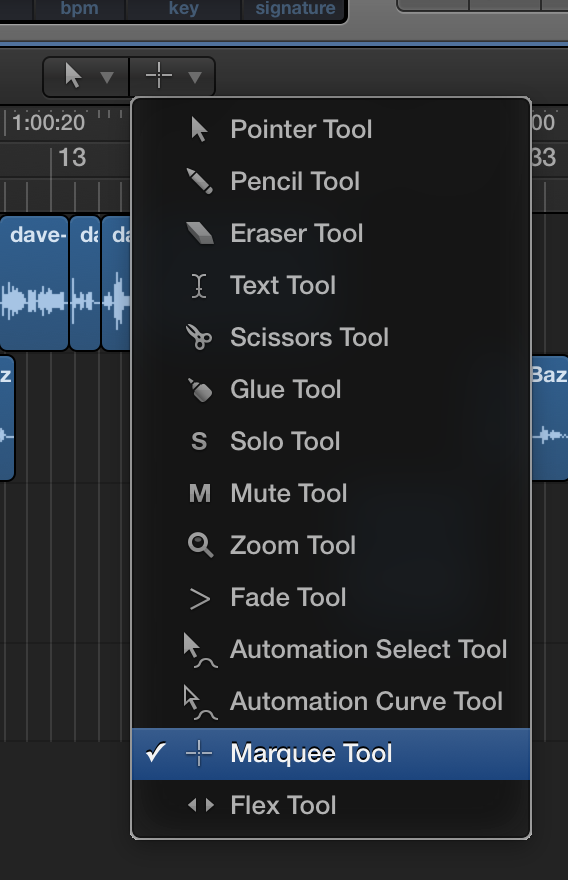
I do remove any bumps, clicks or any other background noise that I think might distract the listener. Often the noise is in a single block so I can just click and delete. Sometimes you need to divide up a block of audio, the fastest way to do this is to set Logic’s secondary editing tool to be the marquee tool (see graphic). The primary tool should be the pointer tool. The secondary editing tool is invoked by holding down Cmd. You can use the marquee tool to drag over a selection of audio you want to delete, or by clicking once and hitting backspace you can split a block into two pieces.
Intros
On Atlantic 302 we use a spoken word intro and outro that myself and Pat take turns doing and which is recorded at the same time as each episode. For Worst Case Scenario, we use a short noise that Dave created while messing around with an app called cfxr, a little app that creates various sound effects. I turn the input volume down to -13db because otherwise the master compressor will make it too loud.
Export to iTunes
I prefer to export the song to iTunes as an AIFF (File > Share > Song to iTunes). The only metadata I add is the track name. From iTunes I have the export format set as 64 kbps mono (iTunes > Preferences > CD Import Settings > MP3 Encoder > Custom > 128kbps stereo bit rate + mono) so I just convert to MP3 after the AIFF is imported from Logic. Finally I right click the MP3 and Show In Finder to locate the file.
As I was discussing on the last episode of Worst Case Scenario, I’m a bit of a luddite when it comes to the web. I like reading, and I dislike anything that distracts me from that task. Fortunately the Safari web browser comes with a great Reader mode which strips all the cruft from a page and simply displays the text of the main article, nicely formatted for reading (Firefox has this feature too). I use it constantly.
I decided a few years ago that I wanted my own website to be as readable as the special Reader mode in my browser. Every four months or so I would check to see if anyone had created a WordPress theme that could do the job, but I was never able to find anything suitable. So I wrote my own!
Direach (from díreach in Irish, meaning direct) is the fruit of my efforts, and it is the theme running on this site today. It is my effort to create a WordPress theme that is reader-friendly and accessible.
Typography
Direach doesn’t download a custom font, it uses the Georgia typeface which is a serif font with a relatively large x-height. Created by Matthew Carter for Microsoft specifically for screen use, it is the same font used by Safari’s Reader mode and is installed on the vast majority of computers, phones and tablets. A default serif font is declared for operating systems that do not ship with this font. The default paragraph font on most browsers will render at 18px, increasing to 20px on wider screens. Elements that are not part of the main body of the page have a reduced font size.
Reduced clutter
Almost all WordPress sites have a header at the top containing the site title, subtitle, and the navigation menu. This can take up a large proportion of the screen, especially if the reader is on a mobile device. Direach shifts this content down to the bottom of the article when it is only showing a single post or page. For index pages and the home page, this content is placed at the top. All content is displayed in a single column, apart from two columns of ‘widgets’ at the bottom of the front page. On single item pages/posts, the site title is appended to the article heading.
Small and fast
Not only does Direach not load any external fonts, it doesn’t add any JavaScript either. The markup is relatively clean. Even on my fairly slow US-based shared host, it loads relatively quickly.
Direach is licenced as GPL v2 or later and the source is available on GitHub. There are a few issues I still need to address – the image in the masthead does not deliver a retina size for devices with high-density screens, despite poking around in the source of get_header_image_tag I couldn’t find a way to get it to emit srcset attributes, despite this functionality being added in version 4.4.0. I’m not 100% happy with the final design and there are still a few rough edges.
I may submit this theme to wordpress.org in the future after a bit of dog fooding, although I think the design may break one or two of WordPress’s theme guidelines.
Reflections
It took quite a bit of work getting Direach to this state, in particular to get the theme working with some of the weird cases in the WordPress test data set. At various stages I worried whether this theme is too stark – almost Brutalist in nature. I also worry that it gives this site a slightly-too-authoritative tone. But overall I’m happy with the results.
Installing
To install this theme on your own site, go to Direach’s home on GitHub and under Clone or Download choose Download ZIP (your browser may automatically decompress the theme, in which case you will have to recompress it). Upload this theme to your WordPress install via Appearance > Themes > Add New > Upload Theme. You can upload a custom image beside the site title under the Appearance tab of the admin interface.
On Worst Case Scenario, the podcast I host with Baz Taylor and Dave Sims, we use a WordPress plugin called Seriously Simple Podcasting to host our podcast feed. It’s a fantastic minimalist plugin with little bloat and works very well for us.
We also installed an add-on called Seriously Simple Stats which would give us download counts for each episode of the podcast.
However the plugin wasn’t showing the client information properly and this was annoying Dave.
The three of us poked at it at various points during the day, and despite not being WordPress experts (and in my case, being very far from a PHP expert), we managed to get it working.
Podcast app User agent Strings
Here are some user agent strings reported by one or two podcast apps:
“AppleCoreMedia/1.0.0.13F69 (iPhone; U; CPU OS 9_3_2 like Mac OS X; en_ie)” – native iOS podcast app, amongst other things
“Pocket Casts” a podcast app that is particularly popular on Android
“Overcast/1.0 Podcast Sync (x subscribers; feed-id=y; +http://overcast.fm/)” – from Marco Arment’s Overcast app, which helpfully tells you how many subscribers you have in the agent string
“iTunes/12.4.2 (Macintosh; OS X 10.11.5) AppleWebKit/601.6.17” – downloads from the Mac version of iTunes
Here’s the bit of the plugin that detects what client you’re using
Hm. There was no entry for AppleCoreMediaPlayer, which was why downloads from the native podcast app were being detected as ‘Other’. But we tried downloading episodes from iTunes on the Mac and that was still recorded as Other.
In fact, apart from plays from the website, every client was being recorded as ‘Other’ – except for Pocket Casts. What was going on?
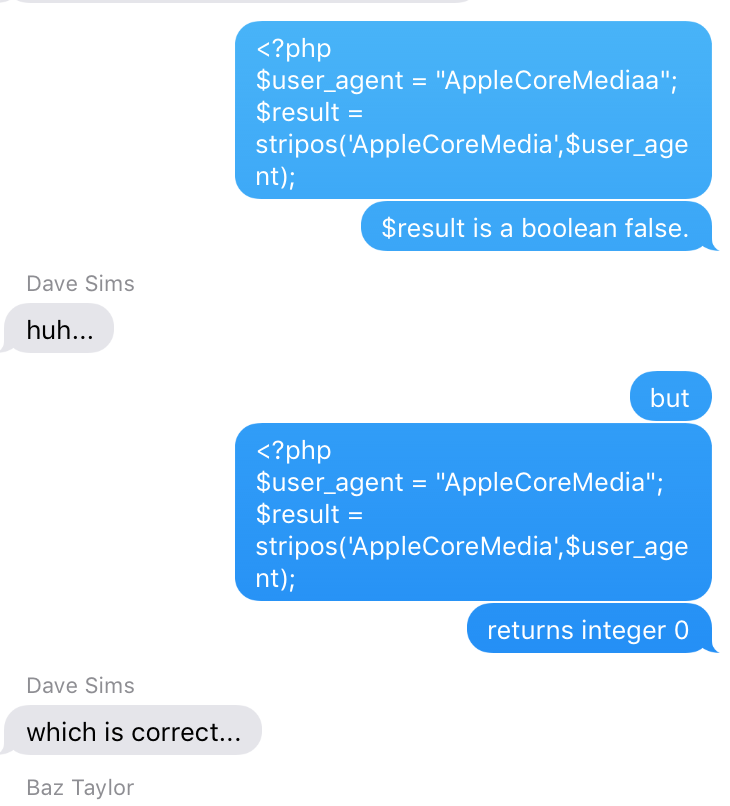
When your needle and your haystack are the same size
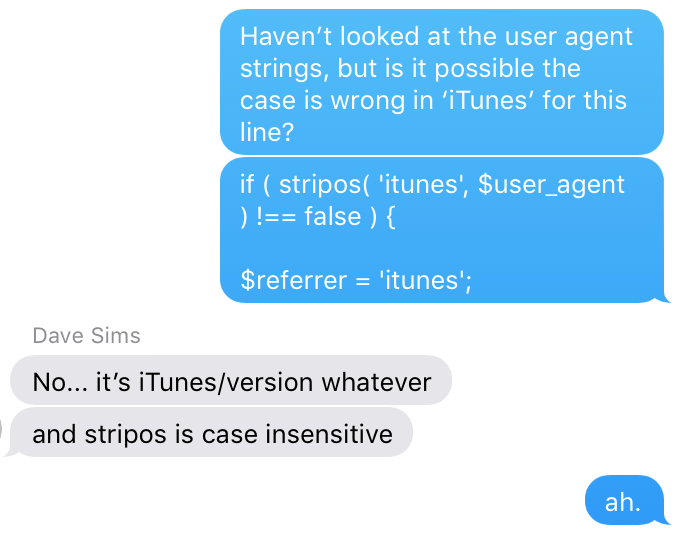
The stripos($haystack, $needle) function in PHP looks to see if a string $needle is in the string $haystack, if it is, it returns an integer with the position of $needle in $haystack, otherwise it returns false.
Absentmindedly, I typed ‘php’ in a mac terminal expecting to get an error, but instead getting a blank prompt, indicating I could type PHP code enclosed in <?php ?> and hit ctrl-D to make it run (why does OS X ship with PHP? I have no idea). I tried a smaller test case:
Those of you reading probably have the aha! moment by now, but it took a bit of probing from Baz before I got it:
And that was also the reason why Pocket Casts was showing up correctly – because the entirety of the user agent string is “Pocket Casts”! Anyhow, changing the function around to read
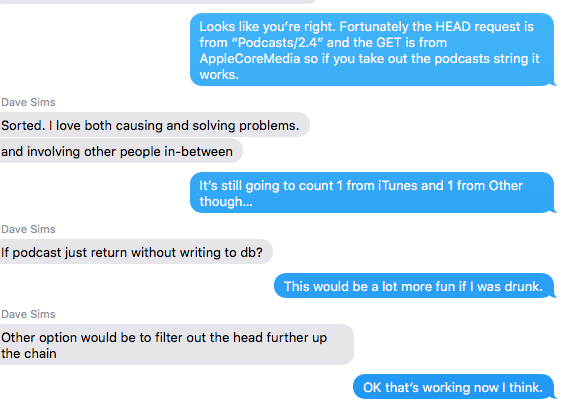
and adding AppleCoreMedia to the list got everything working fine. Well almost.
Double hits from the iOS podcasts app
We then hit another problem:
Turns out any downloads from the iOS Podcasts app were being counted twice. It seems like Podcasts first sends a HEAD request for the mp3 file, presumably to get size information so it can populate the progress indicator, with the user agent “Podcasts/2.4”. The app then sends a normal GET request for the mp3 file with the AppleCoreMedia user agent mentioned earlier.
Being lazy I just added a return statement if we detected the Podcasts user agent:
I submitted it as a pull request and the maintainer merged it within a few hours. It was fun chatting away with Baz and Dave on iMessage while we tried to fix it.
My friend Emmet called me with an interesting problem today. He had a spreadsheet with 28k rows. One of the columns was an address, sort of separated by commas. The address column was very inconsistent. Some ended in Ireland, others just had the county name, some used the form “County Limerick”, others “Co. Limerick”, and others still just “Limerick”. He needed to do some calculations by county so he needed to extract the county name for each row. As I learned doing the pubs research, Irish addresses are a pain!
I’d dealt with this sort of problem before (not with 28k rows mind!) when I used to work for national charities and it used to bug me terribly.
Emmet found a way to anonymise the data so he could send me a subset. I had a play around with a spreadsheet-based solution before breaking out the Python for a quick hack.
The script below reads in a file called “input.csv” and writes to a file called “output.csv” with the same data, but with the county name and a comma added to the start of each line (or Unknown if the script couldn’t work it out).
The script is case-insensitive, and matches the rightmost county on each line, so an address in Omeath, Co. Louth is correctly identified as being in Louth, and Dublin Rd., Athlone, Co. Westmeath matches Westmeath, not Dublin.
The script is fairly flexible about the structure of the input file, so the address data can be in different columns, or all in one.
Here’s the script:
###Usage: python parse-csv.py###
###Input file must be called input.csv###


#function definition: input_text is a string, all_ireland is a bool
def prepend_address_with_county(input_text,all_ireland):
    #prepare the county list
    counties_list = ['Carlow','Cavan','Clare','Cork','Donegal','Dublin','Galway','Kerry','Kildare','Kilkenny','Laois','Leitrim','Limerick','Longford','Louth','Mayo','Meath','Monaghan','Offaly','Roscommon','Sligo','Tipperary','Waterford','Westmeath','Wexford','Wicklow']
    #add on the six counties if we want all-Ireland
    if all_ireland == True:
        counties_list.extend(['Antrim','Armagh','Derry','Down','Fermanagh','Tyrone'])
    outfile = ''
    errorcount = 0
    linecount = 0
    #loop over each line
    for line in input_text:
        linecount += 1
        #keep track of the county we're going to feed in
        county_match = ''
        #let's keep track of the index of what we have found, we want the rightmost match
        old_find_index = 0
        #loop over all counties
        for county in counties_list:
            #look for the county, starting from the RHS
            # also convert to uppercase first
            find_index = line.upper().rfind(county.upper())
            #have we found anything? (find_index will be -1 if we haven't found anything)
            if find_index > old_find_index:
                #keep the county match
                county_match = county
                #update the rightmost index count
                old_find_index = find_index
        #have we got any matches?
        if old_find_index != 0:
            outfile += county_match+","+line
        else:
            outfile += "Unknown,"+line
            errorcount += 1
    return {"output":outfile,"errors":errorcount,"lines":linecount}


file = open("input.csv" ,'rU')
output_csv = open("output.csv",'w')
result_dict = prepend_address_with_county(file,True)
percentage_error = 100*result_dict["errors"]/result_dict["lines"]
print "%d lines processed, %d Unknown counties (%.2f%%)" % (result_dict["lines"], result_dict["errors"],percentage_error)
output_csv.write(result_dict["output"])


 Noise reduction (dB): 24; Sensitivity 11.50; Frequency smoothing (bands): 10. The last option, Noise: , should be set to Reduce, not Residue.